Getting Rust Contract in Wasm Working with MicroFab
Here are the steps to run the basic_contract_rs using.
- Rust Smart Contract hosted within a Wasm engine
- Hyperledger Fabric v2
This guide will start up a 1 Organization, 1 Peer Fabric Network and start the contract. This is done using MicroFab - a single containerized fabric network that is perfect for fast prototyping and developement. It’s uses the Fabric binaries directly so it is really Fabric.
This is what we’re going to be starting up and running,
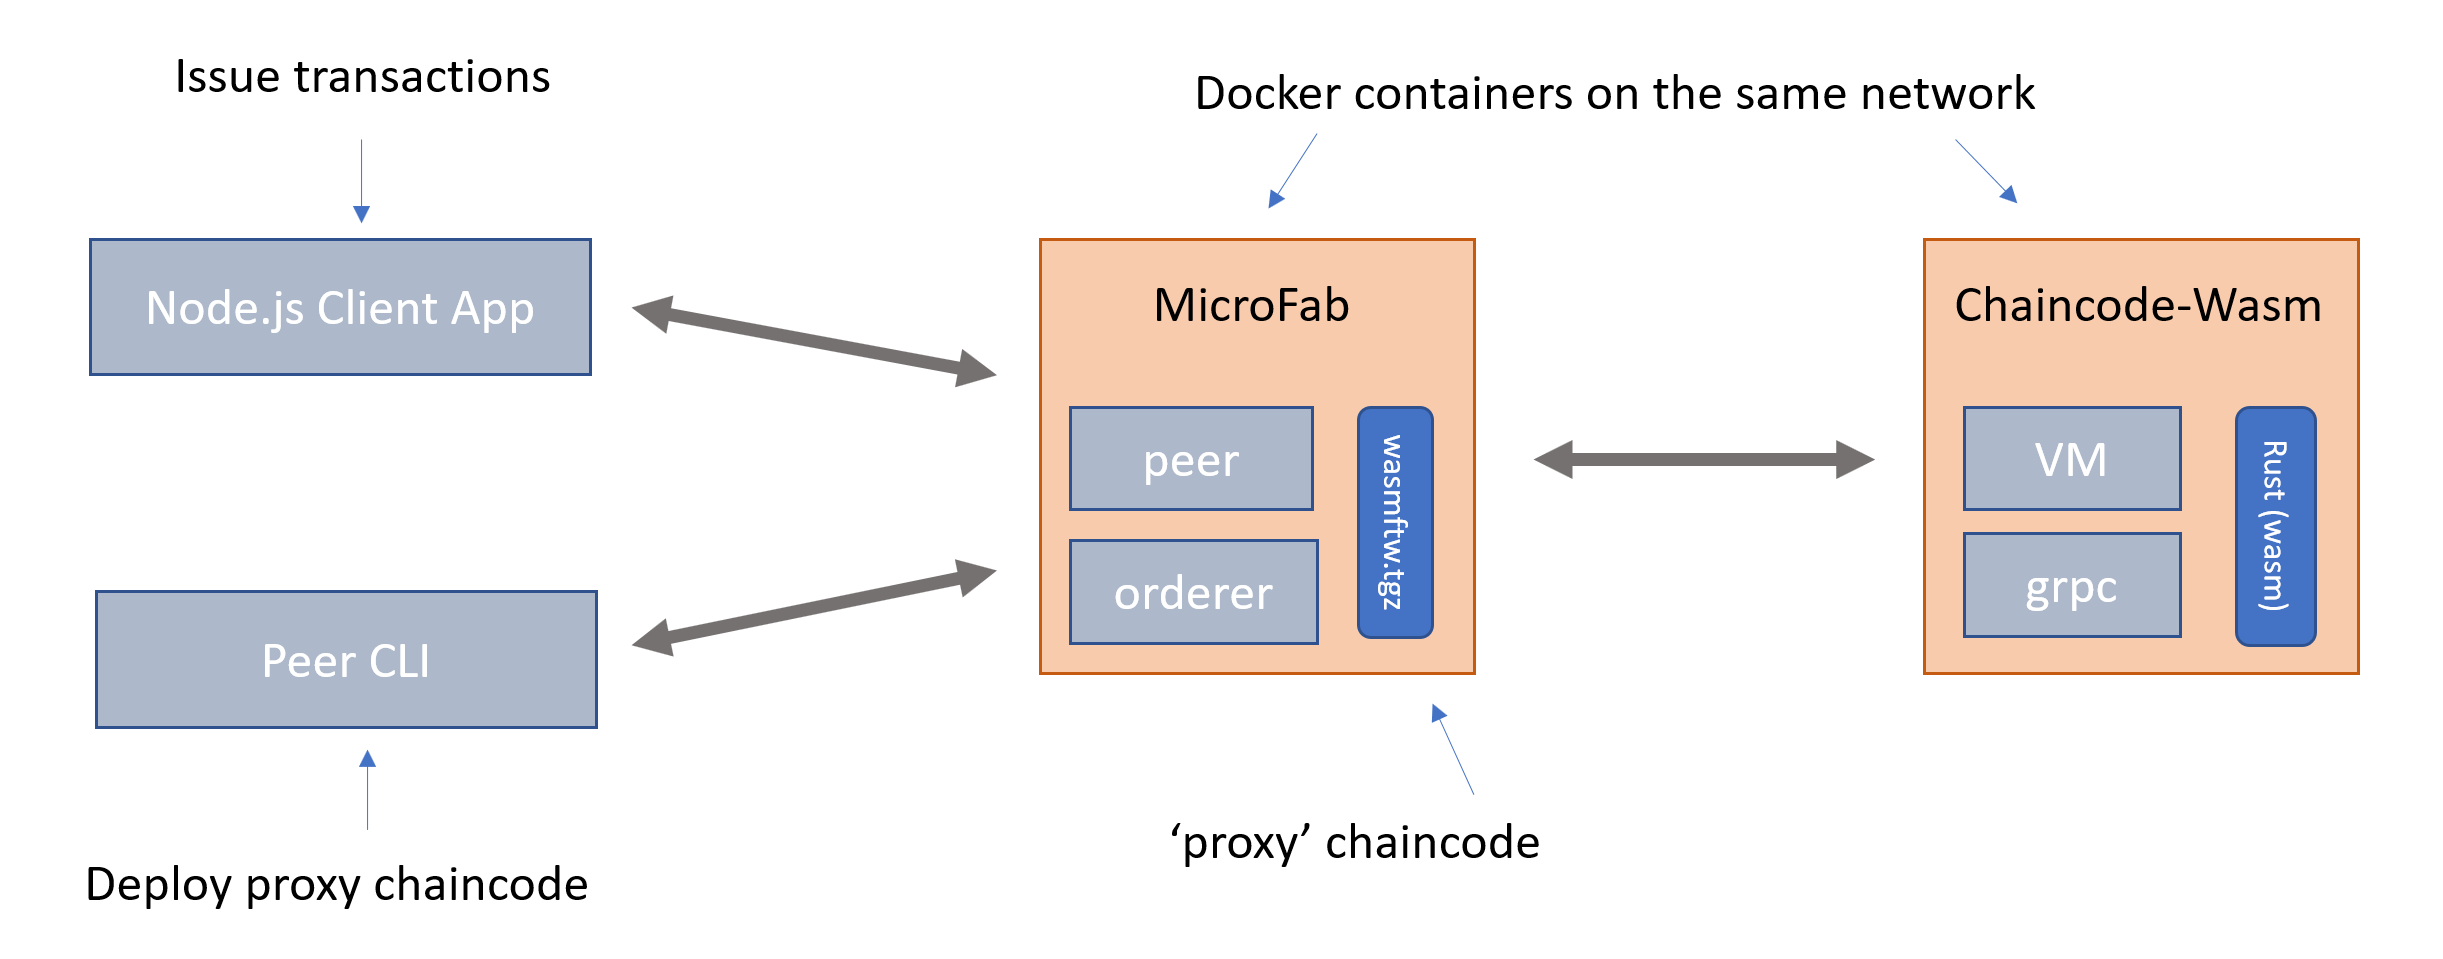
- MicroFab will provide the Fabric v2 runtime, into which we are going to deploy a ‘proxy’ chaincode. We’ll use the ‘peer’ cli commands to do this.
- This proxy chaincode contains the information (host/port etc) for the peer to locate the docker image that the chaincode is running in.
- The chaincode here consists of a Wasm VM, into we’ll load a Wasm binary.
- The Wasm binary will have been built from the Rust
basic_contract_rs
Getting setup
- Install the preqres for Rust and Wasm Development
- Stable Rust is sufficient, nightly is not required. Instructions at the rust-lang.org
- To build a Wasm binary you will need to have the wasm target. Note that wasm-pack is not required here as there is no JavaScript host.
rustup target add wasm32-unknown-unknown
- VSCode is our preferred editor, with the Rust Extension and the Rust Analyser
- Create a working directory to hold the github repos we’ll clone. (examples assume that this is ~/github.com).
Hyperledger Fabric Command Line Tools
We need Fabric Version 2 cli binaries, you may already have these so can skip this.
If not, to get the peer commands (rather than the docker images or samples directory).
curl -sSL https://raw.githubusercontent.com/hyperledger/fabric/master/scripts/bootstrap.sh | bash -s -- 2.2.0 1.4.4 0.4.18 -s -d
Ensure that the commands and configuration are setup correctly.
export PATH=$PATH:~/github.com/bin
export FABRIC_CFG_PATH=~/github.com/config
External builders
Fabric knows about the following languages implicitly. Java, Node, Go. However the peer is not really supposed to be the orchestrator of creating docker images. So this is where the external builder comes in. Microfab is already configured to handle these.
You still need to install a chaincode, but this is really configuration file that says where the actual chaincode is running. This is then added to a tgz archive file and installed as a regular chaincode.
This is a prebuilt copy of this available, but if later you want to do this yourself grab a copy of https://github.com/hyperledgendary/fabric-builders/blob/master/tools/pkgcc.sh which will do this for you.
curl -s https://raw.githubusercontent.com/hyperledgendary/fabric-builders/master/tools/pkgcc.sh > ./pkgcc.sh
Creation
Now we’re going to create the various assets etc that we need
Smart Contract
- In your working directory, clone this repo
git clone https://github.com/hyperledgendary/fabric-contract-api-rust.git
- Ensure it can be built correctly, cd into the
fabric-contract-api-rust- Using make:
make -f justfile wasm - Using just:
just wasm - Using cargo:
cargo build --target wasm32-unknown-unknown
- Using make:
This will have built a Wasm binary to fabric-contract-api-rust/target/wasm32-unknown-unknown/debug/basic_contract_rs.wasm
As we’ve cloned the whole repo, we’ve also got the Rust Contract crates source as well. Normally you would just add the dependencies from crates.io
External chaincode container
Finally we need to have the Docker image that will host the Wasm VM; there’s a prebuilt version of this on docker hub, but if you wish to build it yourself or to change from the default settings do the following.
Clone the fabric-chaincode-wasm reop
git clone git@github.com:hyperledgendary/fabric-chaincode-wasm.git
docker build -t hyperledgendary/fabric-chaincode-wasm .
Copy the chaincode.env.sample to chaincode.env. This will need to be editted shortly, so it’s good to keep a copy of the original
Start Microfab
First setup an environment variable:
export MICROFAB_CONFIG='{
    "endorsing_organizations":[
        {
            "name": "Ampretia"
        }
    ],
    "channels":[
        {
            "name": "minifignet",
            "endorsing_organizations":[
                "Ampretia"
            ]
        }
    ],
    "capability_level":"V2_0"
}'
Both Microfab and the Wasm chaincode will be run in separate docker containers. It’s easier therefore to create a docker network to link these two.
docker network create wasm_network
Then issue this docker command to run MicroFab
docker run --name microfab --rm -d -p 8080:8080 -e MICROFAB_CONFIG="${MICROFAB_CONFIG}" --network=wasm_network sstone1/microfab
Get the MicroFab configuration
When applications (including the Peer commands ) run they need a local identity in a wallet and a gateway connection profile. In this case there’s a helpful script that can pull out all the information needed.
Run this in your working directory - some sub-directories will be created.
npm install -g @hyperledgendary/weftility
curl -s http://console.127-0-0-1.nip.io:8080/ak/api/v1/components | weft microfab -w ./_wallets -p ./_gateways -m ./_msp -f
Then setup some environment variables for the peer commands; these are
export CORE_PEER_LOCALMSPID=AmpretiaMSP
export CORE_PEER_ADDRESS=ampretiapeer-api.127-0-0-1.nip.io:8080
export CORE_PEER_MSPCONFIGPATH="${WORKING_DIR}/_msp/Ampretia/ampretiaadmin/msp"
Contract Deploy
Tip: the wasmftw.tgz and chaincode.env files are in the fabric-contract-api-rust\tests\assets directory if you want to copy them directly.
Package Proxy Chaincode
If you want to build the wasmftw.tgz yourself then do this otherwise, skip to the next step.
Create a connection.json file with details of how Fabric will connect to the external service chaincode
{
  "address": "wasmcc.example.com:9999",
  "dial_timeout": "10s",
  "tls_required": false
}
Package the connection.json file using the pkgcc.sh script
Again if you have the same directory structure, this command
../pkgcc.sh -l wasmftw -t external connection.json
A wasmftw.tgz file will be created. This is the chaincode package that will be installed on the peer - as the proxy for the real chaincode. Feel free to unpack and investigate it’s contents. Note that this is the equiavlent of doing a peer lifecycle chaincode package
Install the Proxy Chaincode
Install this proxy chaincode package.
peer lifecycle chaincode install wasmftw.tgz
It’s important to keep the output from this command as it will be needed in the next step
Run Wasm chaincode
Create a chaincode.env file, making sure the CHAINCODE_ID matches the chaincode code package identifier from the install command. (the one in the tests/assets directory should be sufficient if you’ve also copied the wasmftw.tgz file. Just double check the package id matches)
CHAINCODE_SERVER_ADDRESS=wasmcc.example.com:9999
CHAINCODE_ID=wasmftw:eeae07c6e9455f329e28f9a0eed977ae3549be68e68247018f71dc5a5f511c0d
CHAINCODE_WASM_FILE=/local/basic_contract_rs.wasm
It’s also worth copying the wasm binary file created previously, for example if you’re following the same directory structure run this command from your working directory
mkdir -p contracts
cp ./fabric-contract-api-rust/target/wasm32-unknown-unknown/debug/basic_contract_rs.wasm ./contracts
Run the chaincode: note that this docker command runs it in foreground so you can watch what happens. Worth opening another terminal at this point to run this in docker command in.
If you’ve built you wown fabric-chaincode-wasm container adjust the image name.
docker run -it --rm -v ${PWD}/contracts:/local:ro --name wasmcc.example.com --hostname wasmcc.example.com --env-file chaincode.env --network=wasm_network hyperledgendary/fabric-chaincode-wasm
Approve and commit the Wasm chaincode
Approve the chaincode, making sure the package-id matches the chaincode code package identifier from the install command
peer lifecycle chaincode approveformyorg -o orderer-api.127-0-0-1.nip.io:8080 --channelID minifignet --name wasmftw --version 1 --sequence 1 --waitForEvent --package-id wasmftw:eeae07c6e9455f329e28f9a0eed977ae3549be68e68247018f71dc5a5f511c0d
Commit the chaincode
peer lifecycle chaincode commit -o orderer-api.127-0-0-1.nip.io:8080 --channelID minifignet --name wasmftw --version 1 --sequence 1
Run a transaction!
Create an asset….
peer chaincode invoke -o orderer-api.127-0-0-1.nip.io:8080 --channelID minifignet -n wasmftw -c '{"function":"AssetContract:create_asset","Args":["007","Bond"]}'
Get back the value
peer chaincode query -o orderer-api.127-0-0-1.nip.io:8080 --channelID minifignet -n wasmftw -c '{"function":"AssetContract:read_asset_value","Args":["007"]}'
Using a node.js client application
Running the peer commands is ok, but really one of the SDKs will be used to run client applications.
As an example client application we can use runhfsc. This uses the latest Fabric Node SDKs, and runs in node 12.
npm install -g @hyperledgendary/runhfsc
From your working directory, run this command to point the application at the client wallets and connection profile
runhfsc --gateway ./_gateways/ampretiagateway.json --wallet ./_wallets/Ampretia --user ampretiaadmin --channel minifignet
This will connect and you can see the prompt with the id and channel, type in contract wasmftw
[default] ampretiaadmin@minifignet:<contractid> - $ contract wasmftw
Contract set to wasmftw
[default] ampretiaadmin@minifignet:wasmftw
We can now repeat the final peer command but driving the Node.js SDK
evaluate 'AssetContract:read_asset_value' '["007"]'
Submitted AssetContract:read_asset_value  007
[ '007' ]
>
Bond